Ultrasonic Sensor:
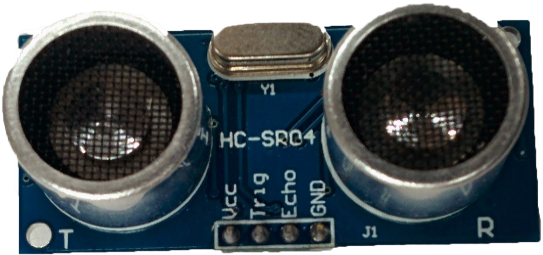
An ultrasonic sensor is a sensor that
emits ultrasonic waves and detects the object that is in front of it with the help of the waves.
There are
different types of ultrasonic sensors. But HC-SR04 sensor is the main focus here
as it is very common for Arduino projects. The detail of this sensor is as
follows:
Transmitter and Receiver:
When we see an HC-SR04 Sensor, there
are two speakers like things. But their functionality is not the same. These are
basically transmitter and receiver. The left one is a transmitter that generates
ultrasonic waves. And the receiver receives these waves.
Working:
As I stated above, the transmitter
generates the waves and the receiver receives them. When the waves are
generated and sent out, the sensor notices their time and if the receiver
receives these waves according to calculations i.e. according to the expected
time, there is nothing in front of the sensor. And when these waves are not received
according to the calculations i.e. they are received before the expected time,
there is some object in front of the sensor. These sensors are cheap and are
very accurate.
Pins:
The first pin on the left side is
the VCC pin which is connected to the positive of the 5v power supply. The next two
pins are Trig and Echo pins which are responsible for the output of information
that the sensor records. And the last pin is the GND pin which is connected to the
negative side of the supply.
Range:
The range of this sensor is as far as
3 meters. We can adjust the range by changing the figure into the code of Arduino as
they are commonly used with Arduinos.
Tasks:
Many tasks can be
performed by this sensor. Such as measuring small distances, we also can place
them at the door with a buzzer so we can know that someone has entered the room.
We can use it as obstacle avoiding feature for our robots, cars, etc. We can do
many other things as well.
Hope that
this article will clear your concept.
Stay tuned.
Bye.


